Thursday, 18 June 2015

DIY Woven Yarn Wall Hanging


DIY Woven Yarn Wall Hanging

I know... I've been missing for 3 months, but I've missed you guys so much! Somehow, uni got the better of me and amongst the never-ending assignments, I simply did not have the time to update (I still don't - I'm two days away from my first final exam but I really needed a break from all that science...), and to apologise, here's a sweet and simple DIY to add a splash of colour to your wall.

What you'll need:


DIY Woven Yarn Wall Hanging

- Cardboard (mine was cut from a cereal box)
- Scissors
- A rod/dowel/stick from a tree
- Assorted yarn and rags (I chose a red, black and grey colour scheme)

1. Cut shallow notches into the top and bottom edges of your cardboard about 1.5 cm/0.5 in apart. Make sure they don't go too deep, otherwise your notches will bend and your hanging won't turn out even on the edges.


DIY Woven Yarn Wall Hanging

2. Take a piece of your background yarn (choose a neutral colour like black, grey or white) and tie the end to the bottom left corner. Weave the yarn up and down between the notches as you move across.


DIY Woven Yarn Wall Hanging

3. I like to start off with my 'end' colour to give my piece some coherence. Take some black (or neutral) yarn and weave in and out across the lines until you have about 5 or 6 rows. You may find it easier to use a darning needle, but I just grabbed the end with my fingers and pulled it across. 


DIY Woven Yarn Wall Hanging

4. Now you can start with the other colours! To give my hanging some texture, I chose yarn of different thicknesses, and wove in some fabric strips I cut from old clothes (yay for repurposing!). Make sure each colour block is of a different thickness to the ones around it to give it some interesting variation.

As you weave, make sure not to pull your yarn too tight. It will make your hanging turn into a bottleneck in the middle - if this happens, you will have to go back and loosen up your yarn.


DIY Woven Yarn Wall Hanging

5. When you approach the ends, you may want to leave a gap at the top where the yarn fits between the notches. I kept weaving all the way up to the top, because I didn't like the empty space. Leave about 1 cm space for your rod. I also tidied off the bottom and unhooked it from the cardboard, and filled in the space with more yarn.


DIY Woven Yarn Wall Hanging

6. Carefully take off one notch at a time and thread the rod through. I tried to keep the little holes facing the same way so they will sit neatly on the rod without twisting.


DIY Woven Yarn Wall Hanging

7. Tuck your ends into the back of the hanging with a crochet hook if you have one, or simply use a bobby pin. You should have something like this:


DIY Woven Yarn Wall Hanging

8. Now for the fringe! Cut out 30 cm/12 in pieces of yarn in three or fewer colours (I chose the colours that stood out the most). 


DIY Woven Yarn Wall Hanging


9. Thread them onto the bottom of the hanging, making sure all of the knots are facing the same way. 

DIY Woven Yarn Wall Hanging

10. Once you're done with the fringe, tie some yarn around the rod and hang it up!

DIY Woven Yarn Wall Hanging

My room has a lot of black and red in it, so this looks great! I'm thinking of doing a few more in different colours and patterns. What do you think?

Friday, 20 March 2015

Funny/Interesting/Awesome (20/3/15)


Getting ready for the weekend? I know I am!


1. Geneva from A Pair and A Spare has this unconventional yet gorgeous DIY backless top to try!

2. For all you perfume addicts out there: this is what your 'amber' perfume is actually made of.

3. I love this image of the moon Prometheus against a backdrop of Saturn's rings - it truly shows a glimpse of the beauty of our solar system.

4. It's a fact that can be hard to swallow at times, but we are far from invulnerable as a species. Will humans last forever?

5. A great read for a slow day, with the usual mix of humour and sarcasm of a Cracked article: 5 bits of "common knowledge" science has disproved (as usual, nsfw).

6. Some helpful hints from College Fashion if you think you dress like you're stuck in a black and white film.

7. As if honey wasn't awesome enough already (especially on toast!), here's why you should incorporate honey into your beauty routine.

8. This is TOO ADORABLE! How to plant succulents in in eggshells (and I bet they would make great gifts - who wouldn't want a tiny plant in an eggshell?!)

9. What a cool idea: throw confetti in some clear balloons for a cheap and easy party decoration!

10. The age old adage: where there is a cat, there will be a box...


Happy Friday!


Wednesday, 18 March 2015

Review: Toni&Guy Glamour Spritz and Shine Liquid Mousse (and a new haircut!)


Quite recently, I had a haircut. I'm not one to hold sentiments over the length of my hair, so I simply showed my mum some pictures (she has hairdressing qualifications) and 2 hours later, I had a new lob! Of course, with shorter hair comes different ways of styling it. In this area, I will admit my newbiness - with my longer hair, I would at most spray a little hairspray into the roots to give it some volume... and that's it, because I have very thick and heavy straight hair that will not hold a curl no matter how much I threaten it with a hot tool. Thus, I had resigned myself to wear my hair straight for the rest of my life.

Now that my hair is no longer so heavy, I decided to try using products to give it some pizazz. Off I went to the nearest Priceline (which happened to be in Town Hall, Sydney) and came across this:

Toni&Guy Hair Mousse Review
Source: TONI&GUY
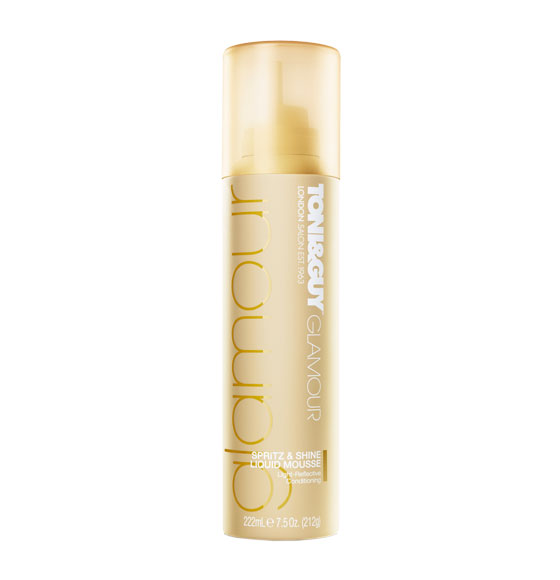
This is the TONI&GUY Glamour Spritz and Shine Liquid Mousse. At first, it was hard to find because its light yellow packaging kind of blended in with the shelves. But I had read great reviews about it online, and it was on sale for $5.00 so I snatched it up, brought it home and tried it on my hair... to my disappointment.


Here's my hair before:

Toni&Guy Hair Mousse Review

Toni&Guy Hair Mousse Review


And after:


Toni&Guy Hair Mousse Review


As you can see, there is a very slight wave to my hair... but that's about it. I was hoping for something more defined, because I scrunched like hell. Oh, how I scrunched. Unfortunately, that made barely any difference to my adamant hair, and in fact, even gave me a little frizz.


THE VERDICT:

- Packaging: Quite nice. I really like the soft pastel colour, and the can's paint had a texture that was nice to touch.
- Product: It would work better on someone with finer hair than mine. However, it just left my hair greasy when I tried putting in more.
- Smell: Not very pleasant to me. Some may like it, but it smells very similar to my brother's hair gel which I'm not a big fan of. Kind of smells like deodorant.
- Longevity: Very good; it lasted over two days in my hair, and if you want to revive it, all you need to do is dampen your hair with a bit of water and reshape.

Overall, it would be a good product for someone with thinner hair that already has some wave to it (and isn't so damn stubborn) as not much product would be needed.


Of course, this is just my own personal experience. By no means is this product bad; it just means it isn't right for my hair (not that I blame it - Asian hair is notoriously hard to style). At the end of the day, I wouldn't buy it again, but I still have a whole can to go through. Let's see how that goes, eh?


Toni&Guy Hair Mousse Review


Sunday, 15 March 2015

What's in my bag?


What's in my bag


They say you can tell a woman by the contents of her bag... Whether that's true for me, I don't know. I like to consider myself a low-fuss kind of girl. I usually don't carry makeup with me, as I don't wear much anyway. More often than not, my bag will be stuffed with exercise books and papers, since I'm a full-time student. I used to be one of those people who carried her whole life with her - bandaids, drawing supplies, novels for when I was bored, a jacket in case I got cold, pencil case, extra shoes in case the pair I was wearing somehow broke - but that got a little heavy (and really did my back in) so this year I pared down the contents of my bag to the bare essentials.

I've always been a big fan of minimalism, so I love the look of this bag. It's a smooth black leather tote that I ordered off taobao when I was in China (cheaper shipping, baby). I'm aiming to cut out even more of my items one day - maybe a smaller wallet, or just having a tablet instead of bring a notepad and pens. Anyway, here's what is in my bag:


1. Hair ties: I have chemistry lab twice a week, and anyone who has ever been near a Bunsen burner knows just how quickly hair can catch fire...

2. Earbuds: Morning commute is a boring obligation we must all go through at least once. To make my 45 minute train ride bearable, I listen to some music while I read my notes (or sleep) on the train.

3. Notepad: Any writer's best friend. You can be waiting for the light to turn green when you're suddenly hit with an idea as fleeting and beautiful as a rainbow. I'm always looking for something to scribble on.

4. Sunglasses: Sydney is bright. Very bright. This pair is by Collette Dinnigan, one of my favourite Australian designers. They're so massive that they protect my cheeks as well, which is awesome - my cheeks get sun burnt very quickly.

5. Phone: For the obvious. Also, Candy Crush.

6. Wallet: My wallet holds money for my coffee. That's the only requirement I have of it.

7. Tablet: The most important thing in my bag. I use it to download my lecture notes, catch up on blogs, surf the web, draw - it's super convenient. Also, Candy Crush.

8. Keys: To get in and out of the house. I hate having to break into my own home.

9. Pens: To write with. Also, to have something to click when feeling anxious.

10. Calculator: Most of my classes involve calculus and other nasty things. Calculators are a must if you don't want to badger the person next to you for answers.


What items do you have in your bag?